TUTORIAL NAME GOES HERE
Disclaimer: These guides to scanlating were made for our GG applicants and trainees. They were written with GG standards in mind so they may not be the same as other groups’ standards.
Page Mode
When you first open the image you must first change the mode of the page. In order to do that you have to identify whether it’s in black and white (grayscale) or in color (RGB). Choose the mode and continue on to the next step.
Layers Setup
Now that the mode of the page has been set, the next step is going to be setting up your layers. Here at GG, we have a very specific way of setting up our cleaning layers so that everything remains adjustable up until the end. It’s a good habit to get into, that way when it reaches the QC’er hands they can make changes without asking you to redo the whole page.
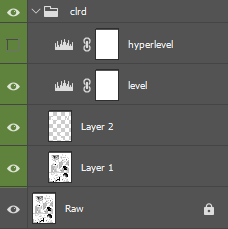
The layer setup should look like the image below. The raw image remains locked at the bottom → create a group (folder) and add all the following layers into the group → duplicate the raw layer to clean on → (optional) transparency layer with all your cleaning → a level adjustment layer to level for dust → a second level adjustment layer for hyperleveling to check for dust.
We have an action you can download that sets up all the layers. You can download it here.

Cleaner Guide
Please click the pink text above to go to the level guide. We have an in-depth guide with a video tutorial as well as pages to download and try alongside the video, and an additional test with an answer sheet inside so you can practice on your own.
Remove Text
Now that you’ve setup your page and leveled, you’re ready to remove all the text! It’s completely optional on whether you want to clean on the duplicated layer or on a transparent layer, BUT it’s best to get into the habit of cleaning on transparent layers so everything you do you always have the option to undo in the future. Cleaning on the duplicated raw layer is like writing with a pen, whereas cleaning on a transparent layer is like writing with a pencil. You can always whiteout your mistakes when using a pen, but if it overlaps with the art then it takes a bit more effort to undo. You can always undo with a layer mask, but you can avoid all that by just cleaning on transparent layers.
Page Mode
When you first open the image you must first change the mode of the page. In order to do that you have to recognize whether it’s in black and white (grayscale) or in color (RGB). Choose whichever mode and the continue on to the next step.
Page Mode
When you first open the image you must first change the mode of the page. In order to do that you have to recognize whether it’s in black and white (grayscale) or in color (RGB). Choose whichever mode and the continue on to the next step.
Page Mode
When you first open the image you must first change the mode of the page. In order to do that you have to recognize whether it’s in black and white (grayscale) or in color (RGB). Choose whichever mode and the continue on to the next step.
Page Mode
When you first open the image you must first change the mode of the page. In order to do that you have to recognize whether it’s in black and white (grayscale) or in color (RGB). Choose whichever mode and the continue on to the next step.
Let's Try it Together!
I compiled 3 pages down below that you can download and clean alongside the tutorial video. These 3 pages are newbie friendly while still covering most aspects of what a cleaner needs to be able to do. I heavily encourage you give them a try if you’re new. And once you’re ready you can try the official cleaner test.
