Tool Overview
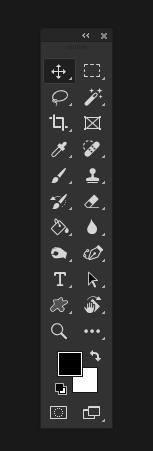
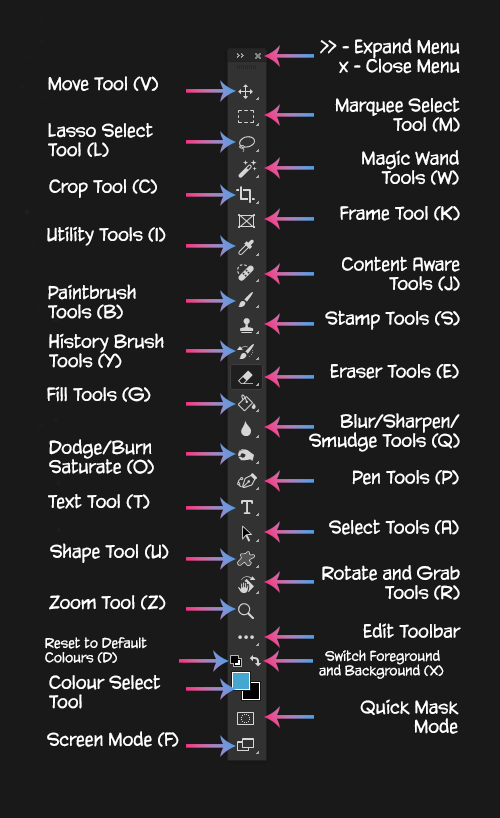
The Photoshop tool bar is located along the left side of the screen by default, but as with all the toolbars and panels in photoshop, it can be dragged around and docked to other parts of photoshop to suit your needs and preferences.
Almost every tool has its own keyboard shortcut, and these shortcuts can be remapped by going to the main menu Edit > Keyboard Shortcuts > Tools.
In addition, whilst it may seem that there are already many tools, almost all of the tools have alternatives or other tools hiding behind them. Every tool that has a small, white triangle in the lower right corner has a flyout menu that contains other tools to select from. These tools are grouped by usage, so, for example, different types of paintbrushes are grouped together.
Many of the tools are rarely used in scanlation work. However, those that are heavily utilised have their own guides/are covered more in depth in specific technique tutorials.
 You can choose to display the tools in either a single column or a double column by pressing the expand panel button at the top of the tool bar.
Tool Presets
Tool presets are saved profiles of the settings you have designated for tools that give you the powerful ability to set the settings for a tool with one click of a button.
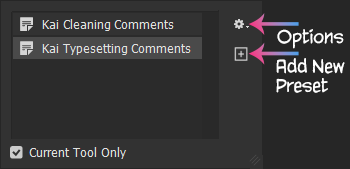
To create a preset, simply set the tool’s options to the desired settings, and then press on the add new button in that tool’s preset window.
From the options menu you can organise, rename, delete, reset, and otherwise manage your tool presets.
In this example we can see two presets for the Note tool. One preset is the settings I use when making notes on a document whilst cleaning. These are in one colour, and are intended as comments that the typesetter might need to see. (Usually to let them know that I moved non-japanese elements like arrows and emojis to layers so they can be moved around, or to ask them to cover up my bad cleaning).
The second preset is for typesetting notes, which are usually messages to the quality checker on things they may need to know.
I colour these notes differently so the the QC can tell which part of the process they’re from. For this reason, I have two presets for the note tool. This means I don’t have to spend lots of time changing the settings, I just click one button and it’s done!
Every tool has the ability to save a preset for it, so I will not be covering it every time in each of the tool descriptions.
The Move Tool
The Move tool is used to move things like layers, guides, and selections.
The Artboard tool is used mostly by people who are creating images for design in web or UI/UX layouts.
Move Tool Options
Toggle Auto Select: When toggled on, this option allows us to dictate that the move tool automatically selects the layer or group depending on the pixel clicked on. If you left click on an area of an image using the move tool, it will automatically select that layer or group to move. If the option is toggled off, the move tool will only effect the layer that you select.
Auto Select Applies To…: This option dictates whether auto select applies to the group or the layer.
Display Transform Controls: This allows us to toggle on or off whether the transform controls are automatically displayed when selecting a layer or group with the move tool.
Basic Alignment: When a layer or group is selected, these options allow us to set the basic alignment of that layer or group. This option is mostly used by typesetters wanting to align their text in the middle of a speech bubble.
Advanced Alignment: Further alignment options can be found by clicking on the three dot menu. Here we can also find the option of aligning a layer or group to a selection, or to the canvas.
3D Movement Tools: These tools are used when designing in 3D.
The Artboard Tool
The Artboard tool can be selected either by right clicking on the Move tool, or by using the keyboard shortcut shift+V to cycle through Move tools.
The artboard tool is used when wanting to create designs for things like user interfaces or websites. The artboard tool allows us to create multiple images in a document that are a specific size – we can select a number of sizes that are specific to things like browser/mobile/screen dimensions.
The artboard tool is rarely, if ever, used in scanlation so I will not cover it, or its options, in depth here, however, this guide is an indepth and useful tutorial in using artboards in your work.
The Move Tool
The Move tool is used to move things like layers, guides, and selections.
The Artboard tool is used mostly by people who are creating images for design in web or UI/UX layouts.
Move Tool Options
Toggle Auto Select: When toggled on, this option allows us to dictate that the move tool automatically selects the layer or group depending on the pixel clicked on. If you left click on an area of an image using the move tool, it will automatically select that layer or group to move. If the option is toggled off, the move tool will only effect the layer that you select.
Auto Select Applies To…: This option dictates whether auto select applies to the group or the layer.
Display Transform Controls: This allows us to toggle on or off whether the transform controls are automatically displayed when selecting a layer or group with the move tool.
Basic Alignment: When a layer or group is selected, these options allow us to set the basic alignment of that layer or group. This option is mostly used by typesetters wanting to align their text in the middle of a speech bubble.
Advanced Alignment: Further alignment options can be found by clicking on the three dot menu. Here we can also find the option of aligning a layer or group to a selection, or to the canvas.
3D Movement Tools: These tools are used when designing in 3D.
