
Using Photoshop Actions
This is a general guide for using Actions when scanlating manga, manhua, manhwa etc. Whilst the example given to demonstrate how Actions work is one for cleaners, the basic principles remain the same no matter what role you’re using them for.
Examples of Actions used by GoodGirls members can be found in the Resources section.
What are Photoshop Actions?
Often, the things you need to do when cleaning a document are quite repetitive. But some of them can be automated, and Photoshop have given us the tools to do so. These are called Actions.
If you are familiar with them, they are basically in-program macros. The most common Action for cleaners is one that automatically sets up your cleaning layers, so that you don’t have to create them, rename them, and organise them on every image.
This guide aims to walk you through utilising actions during the Scanlation process.
Getting Started
First we need to activate the Actions panel in photoshop.
Open up the program, and go to Windows>Actions to open the actions panel. Alternatively, use the keyboard shortcut Alt+F9 on windows or Options+F9 on Mac.

The Actions Panel will open with the default photoshop actions.


Understanding the Panel

Action Set: This is the name for folders that contain Actions, to help you organise your Actions.
Item Toggle: Allows you to toggle items within Actions on or off; as Actions are recorded as a series of instructions to photoshop taken from previous uses of photoshop’s tools, you can select individual items within an Action and turn them on and off. This may, however, cause problems with the subsequent items within the action. For example:
In this Default Action which adds a 50px wooden frame around an image, you can turn off the fill option to prevent that element of the Action from being executed. Doing so will turn the Action check mark to red, indicating that the Action is not complete.

Dialog Toggle: Toggles the dialog boxes that are generated by an Action on or off. This is helpful if you want your action to request a new input for a recorded option. For example, if you have a resize action set up and, each time you run it, you want to set a different size, then you can toggle the dialog boxes on. Otherwise the action will assume to use the same settings from when you recorded the action to begin with.
Action name: This is the name of the Action.
Stop: Stops playing/recording an Action
Record: Records new steps in an Action.
Play/Activate: Plays or activates an Action.
New Action Set: Adds a new folder for Actions.
New Action: Adds a new Action.
Delete Action: Deletes a highlighted Action.
Recording Actions
First, to keep things organised, we should create a new Action set.
Click the “add new Action Set” button and a new dialog box will open up:

Let’s name our new Action Set:

Now let’s add our first Action:
In this new dialog box we can name our new Action, assign it to an Action Set, assign keyboard shortcuts to it, and assign a colour to it for organisational purposes.
Since the most common Action a cleaner will use is the Action that sets up a document ready for cleaning, I’ll walk you through how to set up that Action now.

First, let’s name the new action “New Black and White Image” (because sometimes we will need to set up colour images and we don’t want to get the two confused as they require different options and layers)
Next, I’ve assigned it to the Cleaner Actions set.
I’ve assigned it the keybinding Shift+f2.
I’ve assigned it the colour purple… because I like purple.

And now I’ll press record. The dialog box will disappear and it will seem like nothing has happened. However, the Actions Panel will show that it is recording. This means that it is watching everything you do inside the program and recording it as part of the action.
If you’re not ready to record just yet, you can press the stop button at any time to interrupt the recording process. When you want to start recording again, just press the record button to continue! It’s that simple.

Cleaning Document Setup 1
This is just an example of how I, personally, set up my cleaning documents. Everyone has their own personal preferences, and as long as they let you clean the document without causing any issues for QC, Typesetters, or the quality of your cleaning, however you want to set up your document is up to you!
However, there are some basic things that every document needs.
First things first, before we start recording the Action, let’s open up a completely new image that we would want to set up our cleaning layers on:

And now I’ll press record. The dialog box will disappear and it will seem like nothing has happened. However, the Actions Panel will show that it is recording. This means that it is watching everything you do inside the program and recording it as part of the action.
If you’re not ready to record just yet, you can press the stop button at any time to interrupt the recording process. When you want to start recording again, just press the record button to continue! It’s that simple.

We’ll set up the document as normal, but as we do so, the actions we take will be recorded, so that next time we won’t need to go through all the effort of setting up the layers one by one! We can just press a button and it will happen automatically.
So let’s get started!
First things first, since this is a black and white image, and we want to avoid any colour noise or issues from having the wrong colour profile, switch the image to grayscale:

Cleaning Document Setup 2

Starting in the Layer Panel, let’s set up the layers we will need.

Unlock the initial image that is loaded, rename it to Original so that we have a base to work from, then lock it again so that it can’t be edited, even by accident. I’ve coloured the layer yellow (an option from the right click menu) for organisational purposes. It helps me quickly see what kind of layer it is. In this case, I use yellow to mean “do not edit”.


Duplicate the original layer, rename it to “Base layer”, and change the colour so you can differentiate it from the original. We leave the original layer completely untouched.

Next, let’s create a layer that we will do our edits on. When we are cleaning, we’ll create new layers and clean onto those, then merge them all down onto the Edits layer, so that there is a single layer of edits that can be turned on and off. I colour it blue, just to help me quickly identify the editing layer.


It is rare these days, as we mostly work from digital scans, but often when working from physical scans, you might have to realign or stretch the image slightly, as it might not be straight due to the scanning process.
You may also need to dodge/burn the base image when getting rid of dust.
For these reasons, I always switch the lock on the base layer from a complete lock (like on the original layer), to a partial lock that only stops the image from being moved, as it is easy to accidentally move the base layer when you are cleaning.
Some people prefer to clean directly to the base layer, and that’s valid. My personal choice is to clean on a transparent layer, so that things like smudging, dodge/burning, blurring, changes to opacity etc don’t interrupt the base layer.

Next, let’s create the levelling layers.
First, just create a normal Levels adjustment layer. Let’s colour it red so we don’t get the two different levels layers confused.

Create another levels layer, rename it “Hyperlayer” or “Hyperlevel”, and drag the middle slider all the way to the left, ready to be used.
The hyper layer is used in the levelling process. You can learn more about that in our levelling guide.


Finally, group all the new layers, except the Original Layer together, so that the typesetters (and you) will find it easy to switch between the cleans and the original layer.
Press the stop button to stop recording the Action, and you’re done!
Here’s a quick video that shows the layer setup process.
Other Recording Options
When recording an Action, you might find that a lot of menu items are greyed out, and that might lead you to believe that you can’t use menu commands in Actions.
However, the truth is, that you can insert menu items, you just need to do it in a special way.
Within the Actions Panel, whilst recording an Action, go to the three line menu in the top right, and select “Insert Menu Item…” from halfway down the list.
After selecting this option, you can then use the menu items and add them into the Action.
Now, when you run an Action, either the menu item will be executed, or a dialog box will appear that requires the specified input.
If you want the Action to run without stopping, toggle the item dialog option off. This way, it will use the automatic settings that are remembered by that option from your last use. For example, if your menu item command resizes the image, it will use the options in the resize dialog that were entered the last time you used resize.

You can add a pause to your Actions using the Insert Stop… command.
Within the Actions Panel, whilst recording an Action, go to the three line menu in the top right, and select, “Insert Stop…” from halfway down the list.
Whilst this menu item is called “insert stop…” what it actually does is insert a pause into the Action, so that the user can perform a manual step.
After choosing Insert Stop…, a new dialog box will open, giving you the opportunity to insert a message. This is a message to the user, indicating what should happen at this time. Checking the “allow continue” box will give us the option to either pause the Action or continue the Action at a later date.


You can add a conditional to your Action as well!
Within the Actions Panel, whilst recording an Action, go to the three line menu in the top right, and select, “Insert Conditional…” from halfway down the list.
Insert Conditional allows you to… insert a conditional. That is, it allows you to insert an Action Item that says, “If the document is X, then do Y, otherwise, do Z.”
There are a number of options from the drop down list to choose from.
Once you choose the condition, you can choose what happens next. You can pick another Action to run if a conditional is met, meaning, you can set up another Action that alters the current document so that the rest of the Action will have no issues.
A good example of this could be that when you make an Action that is used to set up a document for cleaning, but you have a selection present. If you run the Action like that, then when the Action creates the Levels and Hyperlevel layers, their layer masks will take on the shape of that selection. So you can insert a conditional that says, “If there is a selection, run Action B” and the original Action will run to the point it reaches the conditional item, then run Action B that clears the selection, and then continue with the rest of the original Action.


Playback and Button Mode
There is an alternative display mode for Actions.
Simply click on the three line menu in the top right, and select “Button Mode”. This will toggle the display of actions from folders into buttons that you can press to run the action. When you want to change it back, just go back to the three line menu and untick the “Button Mode” option.
The buttons can be coloured when you set up the Action, or when you edit it.

You can set the playback speed of an Action using the “Playback Options…” item in the three line menu within the Actions Panel.
This gives you the option to play the Action at a faster pace than normal, to play it slowly, step by step, or to insert pauses between the action items.
This is useful if your PC is struggling with a particular action and you need to slow things down, or if you have a long action and you need to speed things up.

Editing Actions
If you make a mistake, want to alter an action, or insert additional steps, its really very easy!
Expand the Action you wish to edit, find the part you wish to change, and double click the item to change those options.
Alternatively, you can press the record button to record additional actions. These will be inserted underneath the currently selected Action item.

In this example, I am editing the action so that instead of renaming the layer “Hyperlayer” it renames the layer “Hyperlevel”.
You may also drag and drop items within an action, which allows you to adjust the order the items are executed in.

Deleting Actions
Deleting an action is as easy as highlighting the Action you wish to delete, and pressing the delete action button.
Similarly, you can delete individual items that are part of an action in the same way.

Importing Actions
You may find Actions that someone else has put online that may be useful for you.
For example, you can find a list of Actions that members of Good Girls Scans use when cleaning and typesetting in our Resources section.
Importing Actions into photoshop is really easy.
Simply click on the three line menu in the Actions Panel, and select “Load Actions…”, locate the file that you downloaded, and click okay. Now your new Actions will have been imported into photoshop!

Exporting Actions
In order to export your Actions, highlight Action Set you wish to export, click on the three line menu within the Actions Panel, and select “Save Actions…”. Save your actions, and you’re now ready to share them with other people!

Using Actions
We went to all that trouble to set up an Action, but what is it actually useful for?
As mentioned in the introduction, Actions are useful for automating actions that you might perform regularly. If done correctly they can save us a lot of time!
Simply prepare photoshop to the base state you need for an Action; in the case of the Action we just set up, the base state required for that action is to have an image open that you can apply the Action to.
Some Actions will require your image to already have something done to it, for example, some Actions you record may be for doing specific things like highlighting a specific colour or applying a filter to a layer. In order for those to work, the layers must already exist.
Then highlight the Action, and press the Play/Activate button.
If there’s a problem with the Action, a dialog box will pop up saying that there was an issue, and asking if you wish to continue or stop. From there, you can work out what’s going wrong.

Batching Actions
One other very useful thing we can do with Actions is run an action on a batch of files all at once.
This is a little more technical, but can be very useful.
First, we go to File > Automate > Batch… to access the options in order to run a batch of files.

From this window we will pick the Action Set and the Action that we want to use.
Next we will select the files we want to use this Action on. Our options are:
Open Files: Run the Action against all the files that are open in Photoshop at that time.
Folder: Run the Action against all the files that are contained in a folder that we specify.
Import: Run the Action against all the files that are imported from an external source like a camera or pdf.
Bridge: Run the Action against selected files in Adobe Bridge.

Then we can choose what happens to the files once the Action is complete.
We can either choose that the files that get opened and have an Action applied against them:
We can choose Save and Close, however, this requires the files to have already been saved in a psd format.
We can choose that the files be saved to a separate folder by selecting Folder: this requires us to approve the save as dialog for every file.
We can choose to None and let the files remain open in photoshop.
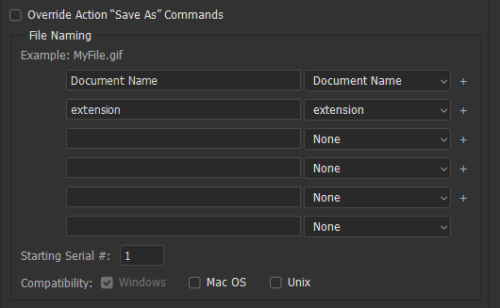
If we want to have the files save to a folder without having to press Yes to the Save As… dialog for every image, then we need to add a “save as…” item to the end of the action we are using.
Then, when we are setting up our batch run, we should select the option to override save as commands. Using these options we can batch save the files we have just edited with the Action into a new folder. We can also use this option to override the original naming structure of a file, should we ever need to rename it!
Once we have finished setting up our Batch options, press ok and let Photoshop do its thing.
In this way, photoshop will open, apply the Action, and then save and close the files you need it to work on, all without you having to lift a finger.
For cleaners and typesetters, this is very useful when setting up a document ready for editing. Simply download the manga chapter raws (or cleans), then set up a batch that applies the document setup Action to them, and press okay. After a few minutes your files will all have their typesetting or cleaning layers ready for you to start editing, and you will have saved a lot of time, effort, and mistakes!
Includes actions useful for cleaners such as: layer setup, grayscale mode*, RGB mode*, duplicate layer*, merge layer*. I suggest you set a shortcut for all the actions with an asterisk.
Includes actions that automatically resizes and changes the spacing between lines so all you have to do is use the select tool to change the size.
Thank you to the following staff for working on this guide:

